If you are a vehicle’s owner, then you may know the importance of wheel bearings in a vehicle’s suspension. However, if you don’t know much about the wheel bearing, then you need to understand that it is actually located in the wheel’s hub, brake drum, or rotor, whereas, bearings provide genuine help to the rotation of a wheel so that it can rotate smoothly during the vehicle moves.
Thus, if you notice a feeling of humming or maybe a whirring noise during the moment of your driving or maybe your ABS light suddenly turns on, then it may be a time to change your bearings further.
However, we know how costly it would become to change your wheel bearing, but what if we tell you that you can save such huge money very easily by changing the wheel bearing yourself?
Well, yes, in this article, we are going to show you how to change wheel bearings on your own so that you can perform your own tasks without any help from a mechanic at all.
So, let’s check out the easiest ways of changing your car’s wheel bearings without any complications and all.
Change your car’s wheel bearings step by step process:

You can change your wheel bearings after checking out all the process below:
Park your vehicle on a flat surface
Start the overall process with all its related necessary precautions during the time of changing your vehicle’s wheel bearings so that you will stay safe while beginning the changing process. And, always make sure to park your car on a level or flat surface, and also, don’t forget to put the parking brake further up properly.
Take help with wheel chocks to provide security to the wheel
For added security, it can be easier and a smart way to further use sturdy chocks by which they can hold the vehicle’s wheels in the absolute place. Obviously, you’ll need to apply chocks on your car’s wheels you don’t think on altering, as your car’s wheels you do alter will be tilted off the ground.
Loosen the lug nuts and then just lift the wheel while using a jack
To get the complete access to such internal parts of the wheel, which bearings you’re going to replacing, you may actually need to elevate the wheel further.
Luckily, most of the new designs of vehicles have come up now along with a jack just for this purpose. However, before you are going to lift the wheel, though, you may require to lightly loosen the lug nuts with the help of a tire iron. After doing this, you need to be more careful to lift your wheel.
Unscrew all the lug nuts and then just remove the wheel
The lug nuts, these are those nuts that you already should have loosened. However, they may come off very easily. Thus, you need to remove these and then put them within the safest place so that you won’t lose such nuts. Your next step would be to itself remove the wheel; it can come freely.
Remove out the brake caliper
With the help of using a socket and as well as a ratchet, you will be able to remove the caliper’s bolts easily. Whereas, then move towards the next step where you have to remove the caliper itself while using a screwdriver.
Remove everything now, dust cover, castle nut, and cotter pin
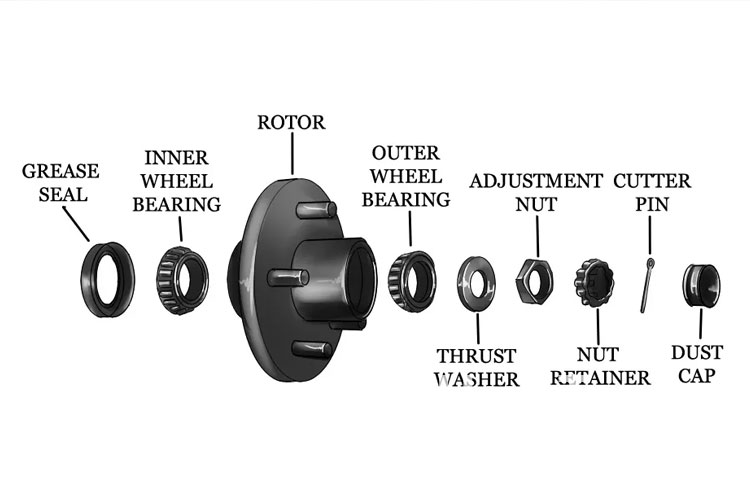
Of course, removing other components would be very important for you. The dust cover is actually a small metal or maybe a plastic-type cap that is here to further protect the components to perfectly holding the rotor in its place.
Normally, you can remove the dust cover by just gripping it along with calipers. However, inside, you will also find the castle nut that would be usually secured with the help of a cotter pin. You need to remove the cotter pin along with wire cutters or pliers, then simply and more gently unscrew the castle nut and then remove it.
It’s a time to remove the rotor
For doing this, you need to first place your thumb tightly on the peg in the middle assembly of the rotor. Tight (but slightly gently) strike the rotor itself just with the help of your other hand’s palm. Then you may see the wheel’s outer bearing starts to loosen or even fall out easily. Then, you can easily remove the outer bearing. And, then finally, it’s a time to remove the rotor itself.
Unscrew and remove the old hub
The wheel bearing is actually found inside the hub, and that would be normally held in place along with the several bolts that are all screw in from backward.
However, these are actually tricky bolts to reach easily because they are tucked off in the undercarriage, and that’s why you need to take help with a kind of skinny socket wrench or maybe a breaker bar to further loosen and easily remove them. Though, when you have successfully removed the bolts, you can now take the hub apart of the axle.
Dissembling the overall hub assembly
To gain complete access to the bearings, then you will surely need to take off the hub further. And for doing this, you may need to take help while using a wrench (or even a hammer) so that you can easily remove the hub’s end and as well as, any anti-lock brake wheel.
After that, take help while using a specialized “puller” tool that can provide you good help to easily remove the central bolt. And then, you may see that the overall bearing assembly easily comes apart.
Remove all the races and then cleans out the knuckles:
Removing the overall bearing assembly’s races normally means that you are physically breaking them along with a grinder or maybe with a hammer and chisel.
And of course, because of this, you will actually need to have further replacement races ready. However, when you are done with this removing the process of the race, it would be a good idea to quickly clean the inside as well of the bearing assembly throughout the knuckle.
It’s finally a time to change wheel bearing:
Now, this would be your final step, set new races in their right places in the bearing assembly along with several taps from a hammer. Now, finally, anoint a new inner bearing and, furthermore, start your installing process in the assembly.
Also, you need to make sure that the bearings are correctly aligned so that they won’t disturb or damage anything after.
Replacing out all the components one by one in the reverse order:
So, that you have successfully change the wheel bearing, now it’s a time to replaces all those parts which you removed earlier. You need to be more careful while replacing the parts through a reverse order one by one.
Conclusion:
Now, we hope you may know how to change wheel bearings on your own without taking any help, right? Feel free to ask any questions regarding the topic in our comment section below, and don’t forget to share this valuable info with your friends and family.


